

How to Retile Your Old Fireplace
Updated: Aug 29, 2023
Retiling our fireplace was a project that was a long time coming.

frame tv | frame tv art | vase | branches | faux candlesticks | wedgewood candlesticks | marble herringbone tile | marble subway tile | marble pencil tile | brass fireplace screen
If you've been following along on Instagram or Tik Tok then you may know I started our fireplace back in February.

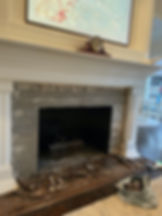
I tackled all of the demo and tile prep... but then our fireplace sat for six long months looking like this.

I decided to use the tile I bought for the fireplace in the laundry room makeover instead and was honestly a little intimidated by the project too. Looking back, I truly think it all worked out for the best. Tiling the small backsplash area in the laundry room was the perfect way to warm myself up to the much larger tiling job that the fireplace turned out to be.

After tackling the laundry room (and ordering a bit more tile) I felt 100% confident to dive into finishing the fireplace. So let's get into how this project went from start to finish!
Supplies:
- hammer or chisel (to remove old tile)
- hardiebacker board (if yours is still in good shape after demo you can skip this step, but ours was not)
- your tile of choice (I used this marble herringbone for the surround and this marble subway tile for the hearth)
- your edge tile if needed (this is what I used and it was a game changer in making the fireplace look finished and professional )
- wet saw- I rented this wet saw from Home Depot
- mortar- this is the stuff that is going to adhere your tiles to the wall
- spacers
- trowel
- float
- grout- I used sanded grout in the color fresh lily
- grout release- needed when tiling with natural stone
- caulk (I recommend purchasing caulk that matches your grout)
- sealer- needed when tiling with natural stone
- sponge
- dry erase marker- to mark cuts
Let's get into it!
Demo
I didn't really know what I was doing, but I started hacking at the fireplace with a hammer and sure enough that worked! Note- I realized I needed safety glasses approximately 30 seconds after this photo was taken.

About an hour later and Kris and I had been able to get all of the old tile off the surround and the hearth. We were left with a pretty scraggly and uneven surface on both, but I was still so excited!

Prep
I decided to rip the old hardiebacker board off the surround and replace it. I used the old boards as a template for the new pieces. This stuff was really hard to cut, all the tutorials online said to score it with a utility knife and snap it, but that was not working for me at all so I took my jigsaw to it. This stuff really did a number to the blades and I probably went through about three of them, but I finally got through it all and had my new pieces ready to go.

I bought these hardiebacker screws to drill the boards into place on the fireplace, but our surround has concrete behind it and those screws were not budging. After quite a bit of trial and error I finally just grabbed my nail gun and popped nails in every 18-24" or so and that did the trick!

Once I had my surround prepped it was time to address the hearth. I used some self-leveling compound to pour into the area to give myself a nice level surface to work with. To prep the hearth for the leveling compound I first had to prime. The primer ensured that the moisture from the compound didn't soak into the concrete.


I used this drill attachment to mix up the compound and then we poured a thin layer onto the hearth.

From there it was just a matter of making sure no one stepped on it for the next 24 hours while it dried... and then this is how our fireplace sat for six months.
Tiling
I made sure to do this on a day my husband Kris was off of work and I will say that tiling is always going to be easier with two people. One person to cut tile and one person to place it makes things go so much faster. It was also really nice to have someone to discuss the layout with and make sure we were thinking through all of the details. First, we rented this wet saw from Home Depot.

It's the same one we rented for the laundry room and it worked great! Kris got it set up, plugged in, and the water pump placed into a nice big bucket of water. Then we started discussing the layout for the tile- we weren't sure if we should start in the center, the left or the right side...

And there were certainly pros and cons to each thought process. If we started in the middle we were going to have a lot more cuts to make with a lot more seams and waste on the sides. If we started on one side then we wouldn't end up with the pattern being perfectly symmetrical on both sides. We ultimately decided to start in the bottom left hand corner, one tile up from the bottom (there was about an inch of a jut in that we wanted to avoid dealing with so the tile could go straight up). I don't know if this was the best decision, but it worked and we finally got to placing the tile.

Thinking through the placement of each tile and planning each cut was a lot more complicated than either of us has anticipated. Kris and I kept commenting how much trickier this was then the laundry room backsplash had been.

At the top of the surround the tile wasn't tall enough so we had to go back in and place little triangles of tile that Kris cut for me.

We used mortar mixed with a 2-1 mortar to water ratio. I put the mortar on and then used the trowel to create textured ridges before placing the tile on.

Kris cut the marble tile sheets on the cardboard they came on to provide extra stability.

We left a small 1/2" gap on the inner sides of the surround so we would have room to place the marble pencil tile we would be using for the edge (don't skip picking an edge- this made the fireplace look so finished and polished- it was a game changer!)

In areas that had a piece of molding jutting into it we just popped the individual tiles off the mesh backing and cut those pieces separately.

After about six hours of tiling Kris and I were finished with the surround and were left with this.

We had every intention of finishing the tile for the hearth on the same day, but we definitely ran out of time. The next day Kris was headed back to work so I was on my own to finish up the hearth.

My mom helped me lay out the marble subway tiles so we could mix them up. Some pieces were more gray and some were more white, so this ensured that we had a nice mix of both tones throughout.

I placed as much tile as I could before it was time to start cutting. This was my first time using the wet saw by myself and it was certainly a lot easier than I had anticipated.

I set the metal guide to where I needed it and slid the tiles right on through. I had a few cuts to make on the sides and then at the top each piece had to be sliced long ways for a nice snug fit.

While I found that spacers weren't necessary for the herringbone tile sheets on the surrouns they were essential for the hearth. The spacers not only kept the tile spaced evenly, but it also kept them level. It took me about 4-5 hours of tiling to knock this out. Looking back that seems so slow, but hey! I'm a beginner tiler!

Once all of the tile was laid I let everything dry for 24 hours. Well technically, I ended up letting it dry for several days because I was so worn out from tiling that I couldn't bring myself to grout yet. I waited until Kris was off again to help me knock it out! I first brushed on this grout release to protect the marble from absorbing the grout.

We used this grout in color fresh lily and mixed it using a 2-1 ratio with water. I was looking for a thick consistency (not runny or drippy at all). Thankfully, Kris sped this process up so much- he put the grout on with a spackle knife and then I smoothed it out and pushed it into the cracks using a float.


We were able to knock out the entire surround and hearth in about an hour. I let my grout dry for about thirty minutes and then came back with water and a sponge to lightly wipe everything. This removed the initial grout haze and then the next day (about 24 hours later) I came back and gave it a much harder scrub. I scrubbed using a water and sponge again and a dry towel also really helped bring the shine back.

After this I caulked all of the seams (finding a caulk color that matches your grout is a must!) and brushed on this marble stone sealer to protect our marble from staining.

That was it! I purchased a few last minute styling touches for the fireplace- like this fire screen, this vase, and these branches (oh don't forget these super realistic looking faux taper candles). And our fireplace went from looking so so sad and brown...
to being a really special focal point in the room. I love it!

Even though I will admit this project was a huge undertaking and possibly one of the hardest I've tackled, it was so so worth it!

Budget Breakdown:
- tile- $740
- hardiebacker board- $25
- self-leveling compound + primer- $28
- 2 day wet saw rental- $211
- tiling supplies- trowel, float, grout, mortar, caulk etc- $250
Total cost- $1,254

Let me know if you end up re-tiling your fireplace because you know I want to see it! Be sure to tag me on Instagram, Facebook, or Tik Tok!
Want to read more?
Disclaimer: The tile I used in this makeover was gifted to me from Wayfair for my honest, unbiased review and all opinions, words and images are my own.
